For my second project I chose to continue the development of an idea I had for helping us develop empathy in order to be able to consider the development of new products and experiences. The idea was to create experiments which people could do remotely that replicate a small part of what it might be like to live with a disability. I have several experiment ideas but for this webpage I chose to concentrate on manual dexterity as it is something that will affect all of us in our older age.
I used the following experiment to achieve this.
For the coding of this webpage I used the original page I made but changed some of the CSS to reflect more empathic coloring. I also changed the flow of the page as you move through it. It starts with an explanation of the experiment, follows with everyday items required for the experiment and then features a video and instructions on how to carry out the experiment. The page concludes with a chat box that is a call to action to discuss learnings.
Seems straight forward, right? For my limited capabilities and understanding of coding it was a bit of a challenge. I was able to change things like the CSS and HTML with a little bit of effort but where I struggled was implementing the chat box.
First I started by duplicating the chat box page I had already made. Then I tried to include the ability to load photos to the chat box. Unfortunately I found myself unable to do this. It was becoming a stretch and in order to bring the original page together with the chat box I knew I had to abandon this effort as I knew completing the page was already going to be a big task for me.
I then tried to copy the files I had amended from the original webpage which was now had amended CSS and HTML to the chat pic code in VScode. I also copied all the images and link to the video into this folder. When I tried to get the code to function none of the CSS or any data about style worked and the images would not show up on the webpage.
After lots of copy and pasting and control z-ing I found myself several hours later no further along. I decided to try switching things around a bit.
I opened the file for the chat app we created in class and then brought all the files from my web page across to it. This still did not work! It occurred to me that maybe these files where in the wrong place and I began to put them into the public folder within the chat app code.
Success! All the CSS and styling was now showing on the page. The images and video were there too. Next I had to check the chat box. Opening 2 browsers on chrome through localhost:3000 I got this to function.
I successfully uploaded the code to GitHub and it can be seen here.
What was your lesson about? Were there specific questions, interests or themes driving the lesson?
Our lesson targeted questions like, “are you more likely to do something about a problem when it surrounds you”, “what will you do now that you’ve been exposed to this information?”
We wanted to provoke people with visuals that made people question how they spend their money and time on technology. We covered topics such as e-waste, rare earth materials, how technology and humans affect the environment, and the dependency we have on smart technology.
How did you do it? How was the lesson structured? Were there any activities you designed?
Planning
To exchange ideas and create our lesson plan, we met 4 different times for about an hour on zoom. Each meeting, we came prepared with more information and references.
Trolley Dilemma
To find a sense of balance, we decided to divide lecturing and discussion with activities and visuals. We began by introducing the trolley dilemma to set the mindset of the class, so that we could then circle back and pose the scenario again as a “modern trolley dilemma’, making us choose digital tools or people.
Multiple Choice Group Activity
After giving the class this context of having detrimental choices, we sent out a link for everyone to answer multiple choice questions. The questions were formatted so that choice (a) would be more technologically inclined and choice (b) was the opposite.
Example questions:
When preparing a new recipe I prefer to use:
A video to help navigate me through the recipe
A cookbook
In order to have prior knowledge about natural disasters or bad weather:
I prefer to receive a bad weather alert
i’ll read a newspaper OR I’ll react when it happens
We read the questions outloud to keep us all at the same pace to allow for fun commentary from the students. At the end, we revealed that the higher their score was, the more inclined they are to depend on technology. The average score was pretty obvious, considering the context of the class. We wanted for this moment to emphasize our dependency and establish this before seeing some disturbing photos that are the consequences of this.
Breakout Rooms with Photos
We then broke out into 2 rooms for 12 minutes so that there could be more space for the students to guess the context of each photo. Following guesses or awkward silence, the two group members in each room would reveal the context of the image, forcing us all to confront there horrifying circumstances that we may be unaware of.
Class Discussion
We continued the discussion that these photos sparked in the main room, and found our way back to the ‘modern trolley dilemma.’ This caused lots of discomfort and guilt. As a group there was a feeling of helplessness, as we didn’t know what the solution was considering the field of study that we are in. After some back and forth, we interjected to take us on a more positive route so that we could leave the class feeling empowered instead.
Future Solutions
We began our positive conclusion by showing the efforts of big companies such as Google are making to try and reduce e-waste. We dissected the ways that these companies may be promoting their products with environmental intentions but may be just saving money and making more profit. It’s difficult to understand the true intentions of these companies. A great example given by Vince during class was that Apple Airpods alone make an equal profit to Netflix’s whole company – crazy!
We then gave a fantasy-solution-scenario of ‘thrifting technology.’ We proposed that technology could one day be thrifted by most users to reduce waste, the way thrifted clothing has been made trendy. Trendsetters tricked the market into shopping sustainably, once the overflow of clothing became widely known. Why isn’t it likely that the new trend in 2080 will be to thrift a flip phone, get the battery replaced, and have that be your new phone?
The question that we addressed was ‘are people more likely to do something about a problem when it surrounds them?’ The devastating photos we saw in the breakout rooms for example, would people be more likely to be more concerned about e-waste if it was next to their home?
Connection to Covid-19
To really bring it home in our conclusion, we discussed the positive effects technology has had on the pandemic. We shared the ways that technology helped us get to where we are today – vaccinations and getting closer to normal life. We wanted this to uplift the class so we could leave our conversation feeling empowered.
Contributions of each group member:
Noel: Trolley dilemma idea with an introduction and visuals, assigning pre work assignment, photos and google map example with information for breakout rooms, helping out with multiple choice questions, and adding links in reference document
Alexis: Photos with information for breakout rooms, helping out with multiple choice questions, research on how big companies are finding ways to fix the large-scale e-waste problem, ⅓ positive solutions conclusion, and adding links in reference document
Sammy: Facilitating the group for flow of topics, photos with information for breakout rooms, helping out with multiple choice, ⅓ of positive solutions conclusion (thrifting technology scenario) with video visual, adding links and organizing the reference document, blog post
Chumou: Assigning pre work video, creation of multiple choice questions, responsible for the logistics of the multiple choice website, photos with information for breakout rooms, Covid-19 related visuals and information for ⅓ of conclusion with Noel
We worked so well together! Our exchange of ideas flowed smoothly, and it was such a lovely experience.
Why did you choose to do this?
We were inspired by the readings from the previous week, Anatomy of an AI by Kate Crawford and Vladan Joler and Re-thingifying the Internet of Things by Jennifer Gabrys. While reading those works, we were all really struck by how much society’s need for technology was harming the Earth. This was something that we recognized wasn’t talked about as much as it should and we wanted to bring to light these issues while also talking about some of the more positive things technology has done for us and some of the ways that other companies are trying to do their part to fix the system. We thought our discussion and activities would bring out a powerful discussion about something that people won’t feel comfortable talking about, but also give them hope for the future in ways that they might be able to contribute to the solution and have them think more about the ways that they are using their technology.
What were the goals of the lesson?
The purpose of this session is to rethink our responsibility as designers or users of technology by discussing the negative and positive effects that technology products have on people and the environment. Think about what changes we can make in the creation, purchase, use and recycling of technology products.
How do you think it went? Did everything go as planned? Were there any surprises? If you ran this lesson again, would you do anything different?
The class went great! Our flow of topics went as planned, and we got the class rattled up in the subject matter. People responded passionately, kept the conversation going, and felt genuinely concerned about the problems we put forth. This responsiveness and engagement was a relief since lots of our lesson was discussion based.
If we could do anything differently, we’d probably put more thought into what went after the multiple choice activity, since the outcome was pretty similar for everyone. Maybe we could have had a 2nd engaging activity as a group to respond to the multiple choice results.
For my final project in Creative Coding I am using my hard learned, very limited skills combined with my efforts in Arduino to create a game that is impossible to win! This project may be seen as a metaphor for my efforts at coding a game that is impossible for me to win!
The past couple of weeks we learned a massive amount about the power of P5.js and it really opened my eyes to an incredible amount of possibilities once I have developed my skill set further. There are so many things to learn and the versatility of using P5.js with Arduino really excites me.
I felt that I wanted to create something that was whimsical and fun by combining the 2 pieces of software and the ability to use hardware as an interface. The code I put together for the P5 sketch is relatively straight forward. I brought together some ideas taught to us by Ellen and combined that with some code from David that allows the Arduino to communicate with the P5.js sketch.
The main part of the sketch for the game is simple in its premise. It is pretty much pong in reverse where the objective is to move a ball across the x axis on the screen into an end zone while avoiding a paddle which moves up and down the y axis on the screen. The ball can also be moved along the y axis too if required.
The paddle part uses a conditional statement to move across the screen. So I wouldn’t confuse myself and get into trouble I created a sketch which was only the paddle moving. I also used windowWidth and windowHeight properties for the canvas but will probably revert to a particular size for the game. I would then use this sketch later in the Frankenstein method to make the version of the sketch that would be used for the game. This is the sketch for the paddle.
I then transplanted this sketch into the sketch that allows Arduino to communicate with P5.js. This is where the fun really began!
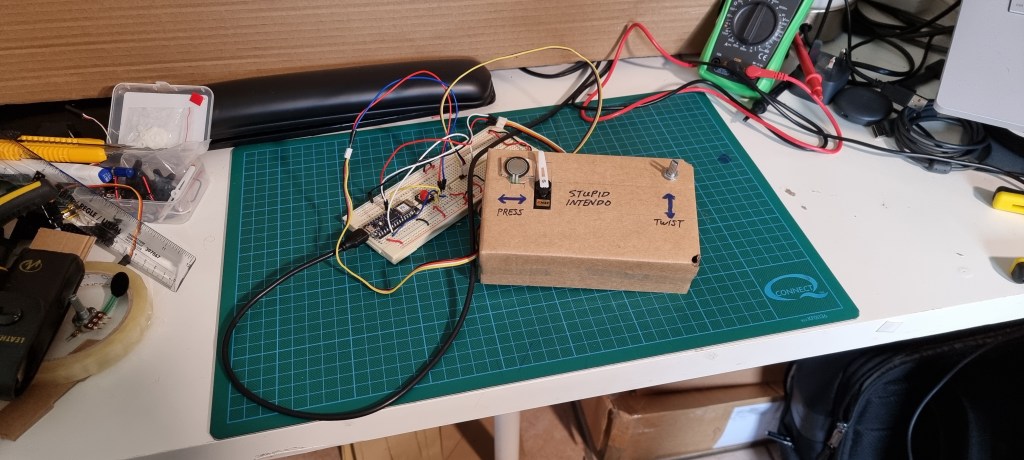
I had spent a lot of time trying the various sensor inputs on Arduino and my objective was to create an unexpected interaction, a dislocation of expectation in military parlance. I wanted there to be an enemy stopping you from completing the task at hand of getting the ball across the line but it wasn’t going to be where you thought it would be. When you are distracted with your efforts to get the ball into the goal on the screen my intent was to have a physical intervention prevent you from achieving this.
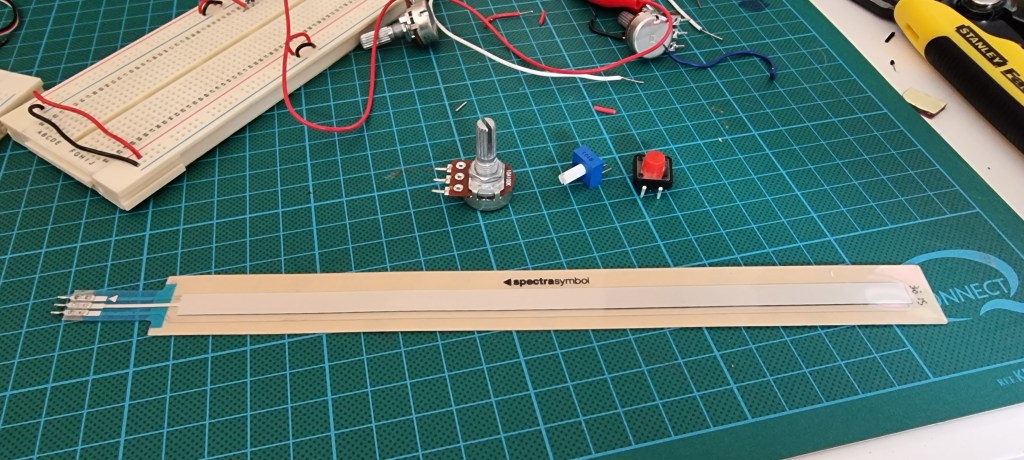
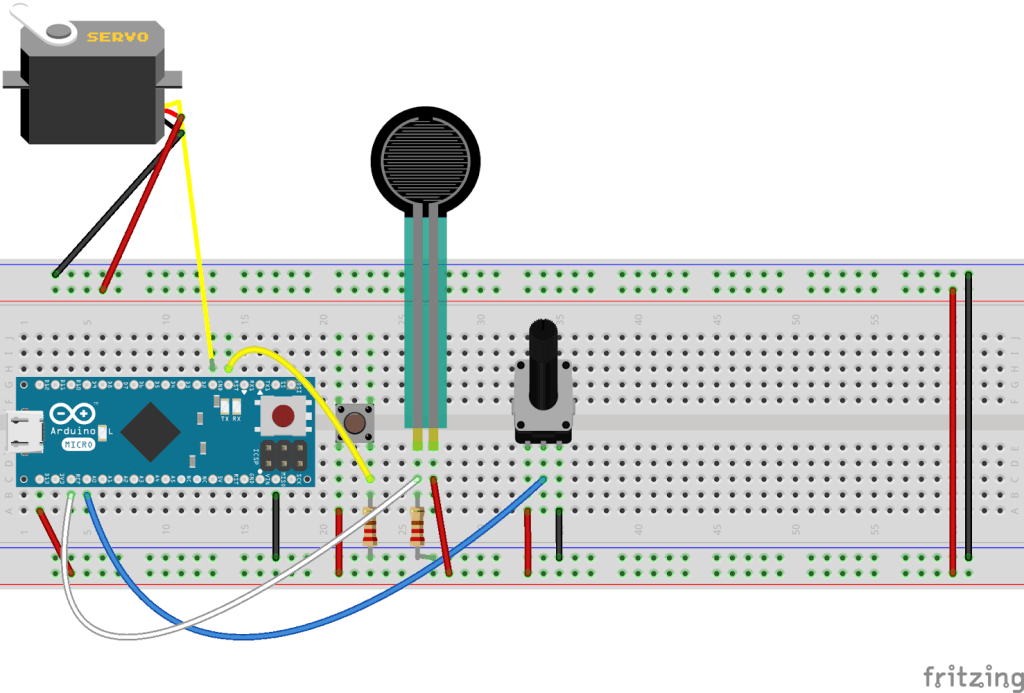
I selected an FSR to be the input for the ball to move on the x axis. The FSR works by force or pressure being applied to the sensor which changes the resistance in the sensor, the measurement of this resistance equates to the distance the ball is moved. So more pressure applied the further the ball moves. The reason for this was that when the force was released from the FSR the ball would immediately go back to its default position, ready to be moved again by the player. The FSR was the control for the x axis and there is a rotary potentiometer for the y axis. In reality the control of y axis via the potentiometer is completely useless and just gives the user the illusion of control. The FSR is where the real action happens!
So there is a physical interaction by way of an FSR and a rotary potentiometer controlling the ball on the screen and there is a paddle that is trying to prevent you from scoring by getting the ball into the end zone. The next stage was to create the physical interaction to prevent you from reaching the end zone. I used a servo motor to create this interaction.
What I found a little bit confusing was switching between P5 and Arduino I would often forget to put in different things like commas and then nothing would work! it was doubly confusing when I would put in something and there was no error thrown because it was doing something just not the correct thing! This I am sure will get better with practice though.
I started to work on mapping the FSR to the servo motor which would also correspond to the position of the ball on the screen. Basically I mapped the servo to activate before the ball reached the paddles. Then I placed the servo beside the FSR so that when you apply force to the FSR the servo is activated. when the servo is activated its arm pushes your finger off the FSR. This physical interaction occurs while you are concentrating on the screen and is completely unexpected if you ignore the hum of the servo!
Here is the complete code for the game so far. It incorporates the code required to get Arduino to connect to P5.js which is work David Rios produced.
I still have some work to do on this project such as noise reduction on the sensors and some experiments with the ball on the software side. I also have to finish building the controller which will be used for the game. This will be ready over the next day or so for the Show A Thing Show on Saturday.
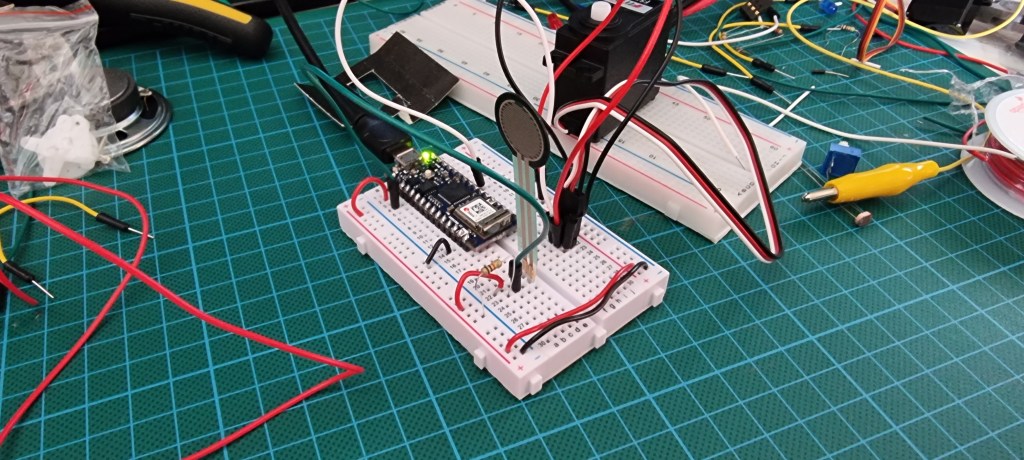
As we went through our last few classes for Interface Lab we began to learn about many more new ways to create physical interactions to P5.js. This started to spark all sorts of new ideas in my head so I decided to challenge myself to build something different and new. I set about this process by playing around with different sensors to understand what the different configurations can do. I had used the rotary potentiometer in one of the labs to create a device that could move a ball on 2 axis on the screen in P5.js and I thought that it might be cool to create a device that used different types of potentiometer to control a game in P5.js, A game with a twist!
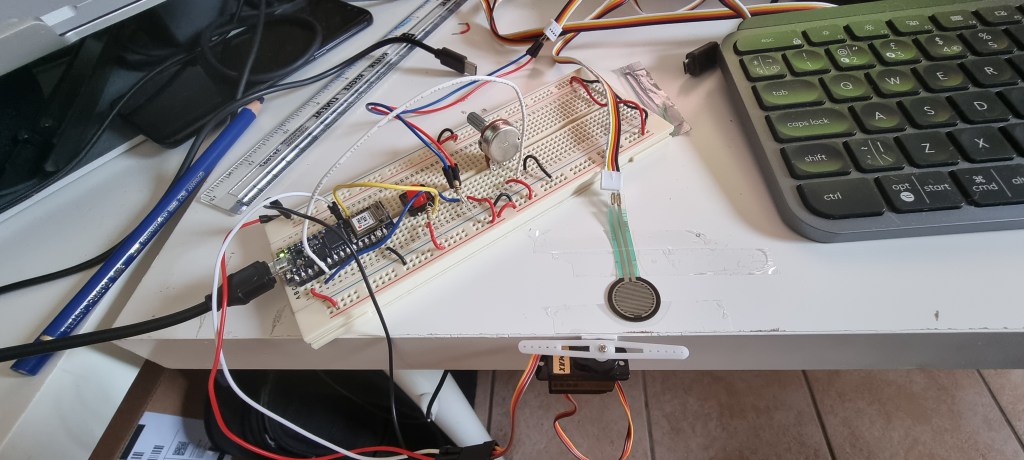
The first thing I did was to ensure that the input from the Arduino would communicate with the P5.js sketch by way of the P5.js serial app. This allowed me to begin working on a P5 sketch that could be manipulated with the sensors attached to the Arduino. I built the setup we learned from David in class and immediately ran into problems. I had not connected the lower part of the bread board to the upper part of the bread board and nothing on the lower part would function! Luckily I got some help with this and I was able to move forward.
Once this setup was functioning I was able to swap out sensors to see what would or would not work. Previously I had used an LDR sensor in place of and FSR sensor which I was able to explore concept ideas with however the rotary potentiometer required a bit more work to swap out if I wanted to use an LDR or FSR sensor for that matter.
It was about putting a resistor in line for the power to the sensor and setting it up a little differently. With a lot of effort I got the FSR to connect. At this stage I had 3 different inputs, a rotary potentiometer, an FSR and a button all connected next I had to make sure that there was reading coming from all three. Opening the serial port and creating print values in the Arduino IDE I was able to get a read out that let me know the sensors were functioning. I wanted to use the FSR for an idea I had but I did not realize how much work would be involved in executing it!
Now I had my Arduino set up, I had my sensors giving a reading, I had the Arduino connecting to P5.js and I had a basic sketch working that was acting based on the input from the sensors. What I wanted to create was a game that was a little like pong except in reverse. Basically a paddle bounces up and down the y axis of the screen and the objective is to get a ball past the paddle into the end zone to win the game. Except you can never win this game! More on this later!
As part of the losers game I needed to ensure that there was no way for the player to get the ball to the end zone. How I was going to achieve this was by creating an enemy that never lets you get the ball to the end zone. This was going to be the second part of my Arduino struggle. It was also the reason I used the FSR to create the input for moving the ball along the x axis. Pressing the FSR moves the ball along the x axis to the end zone. Releasing the pressure or force on the FSR the ball returns to the other end of the screen. I needed to create an interaction that stopped the FSR being effective this is when I turned to my servo motor!
I hooked up the servo on another pin on the Arduino and then connected the FSR to the Arduino too. Fairly basic but still a job for me given my limited experience. I got the FSR to activate the servo and then began trying to figure how to map it correctly. This took a bit of trial and error. Then it was about transplanting this code into the other Arduino sketch in a method I refer to as the Frankenstein. This is where I cobble together a bunch of code and hope for the best and then when it inevitably doesn’t work try to solve the problems through the process of elimination.
I managed to get the Frankenstein monster to work but it was not working with the P5 sketch! Many hours and a lot of head scratching I went back to tutorials on how I could get it to work. My big issue was forgetting to put in the correct characters and switching between Arduino IDE and P5.js caused me to do things incorrectly. I found slowing down to a snails pace and checking everything several times made things more smooth, slow is smooth and smooth is fast! Well at least I hope that’s how it will go in future.
After some disasters and misfires with the code I got the FSR to activate the servo whilst simultaneously moving the ball in P5.js. I then made a very basic prototype of the system which I taped to my desk to test. I had a family member try it and seen the flaws in the interaction with the physical element. Next stage is to get the mapping for the FSR and servo to correspond with the distance the ball moves. Once this has been achieved I can start creating the enclosure.
UPDATE
I got the enclosure worked out and attached the servo, potentiometer and FSR to the enclosure. I tried to take into account ergonomic considerations.
Once I had managed to do this I had to test the game again. There is a lot of interference from the cables being all bunched up inside the enclosure but it was still as frustrating to play as intended!
Finally some instructions on how to use the controller were the final touches.
This has been a really fun project to work on, I really enjoyed the use of the different skill sets we learned over the past 5 weeks and consolidating the efforts into this piece of whimsical art.
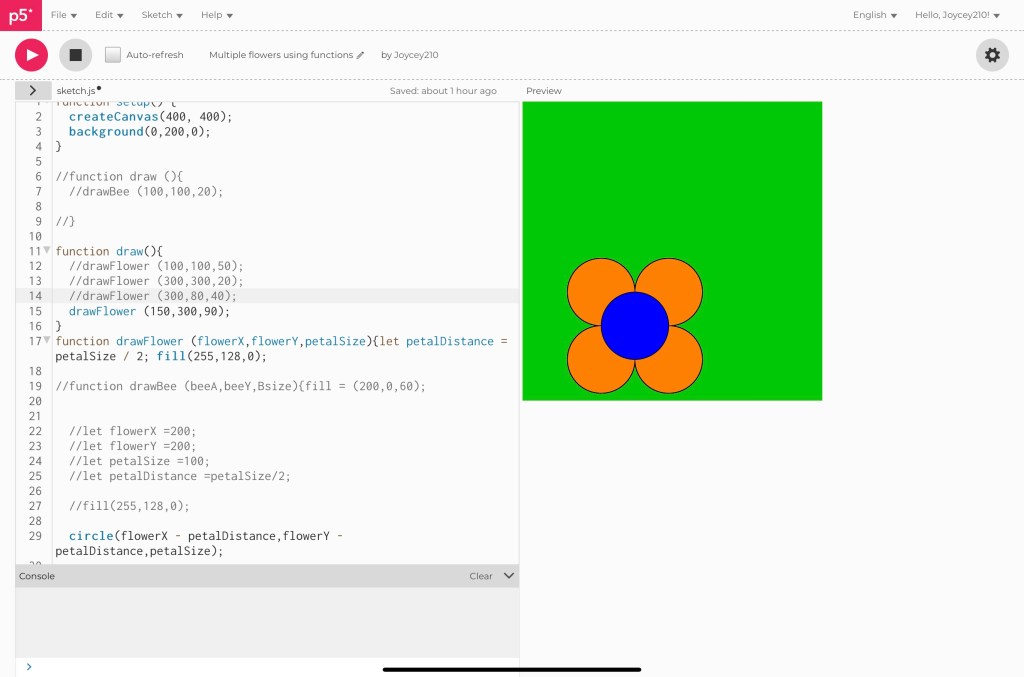
This week we had to work on creating discrete code blocks called functions. The idea behind using these functions is that they can be used repeatedly instead of having to write lots of individual pieces of code to achieve the same result. I did a few exercises to prepare myself as my pace of learning this is not that quick.
I found a cool resource here https://happycoding.io/tutorials/p5js/creating-functions to learn how to create functions. I had been watching the coding train videos which are great but found myself constantly rewatching the videos and pausing all the time. This on the other hand was not video based and was really great for me to grasp the concept.
The first thing I did was create an individual flower and then called the draw function for the flower. I typed out the original code in the tutorial to do this.
Once I did this I was able to create several more instances of the flower in different sizes and refresh the sketch to produce more flowers of differing sizes.
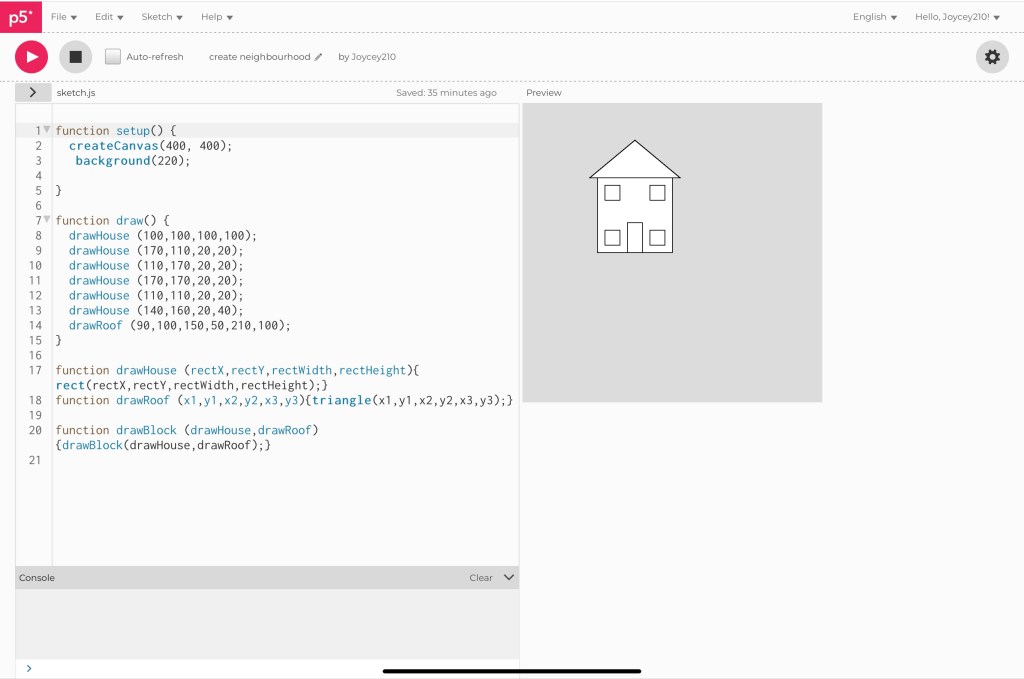
I then tried to use a function to create bees on the sketch but could not get this to work! I will work on this element to improve. I decided to try creating a new sketch using my own functions and made a house.
The next part of this challenge was to create multiple houses which I also need more time to figure out. The roof is separate from the main part of the house as a function, I would like to figure out how to change that and also give the individual parts color. That is what I have to get to grips with next.
I did the other exercise of replicating a sketch assigned to us by using functions.
Here are the links to the sketches I worked on this week.
For my final project I am hoping to build off the positive reinforcement water bottle stand. I want to look at adding a way to communicate the act of drinking water with p5.js.
This way the physical action of drinking water can not only have a physical out put by way of the servo motor but also via the screen of my computer.
Ideally this would have its own screen so it could be used in isolation of a computer.
I see the device working in the following way.
1.
On picking up the water bottle to have a drink the sensor is exposed to light which activates the servo. The servo then rotates showing the nice work! sign.
2.
When this occurs the Arduino also sends an output to an LED as well as possibly a speaker. These could be 2 more signifiers of a successful interaction with the device.
3.
The Arduino will also via serial port interact with a sketch in P5.js.
4.
The sketch on the screen will be of a fish tank with some fish in it swimming. Every time the bottle is picked up the water in the fish tank depletes and then reminds the user to refill their bottle.
I have a couple of ideas on how to achieve this.
What will be required for this will be:
Arduino Nano
LEDs
Speaker?
Servo motor
Cardboard
Batteries?
Jumper cables
Resistors
LDR sensor
I hope to achieve a digital and physical interaction from this device and perhaps see if the same concept be used in different ways for different types of scenarios.
For this project I continued on from labs we were assigned in the previous week. After lots of trial and error I managed to get some things working.
I enjoyed trying to combine different sensors with outputs. I did run into several problems trying to get outputs to function and always checked input sensors via the console to see if there was any reading. Once I knew these were functioning it was about trying to get an output to react to the sensors reading!
There were a few issues with servos not functioning but I was able to get a hold of a smaller servo which could function off the Arduino Nano. I got this smaller servo to work with the pressure sensor and with the LDR sensor. I though the LDR sensor was pretty cool in place of the pressure sensor and began thinking about ideas to use it with.
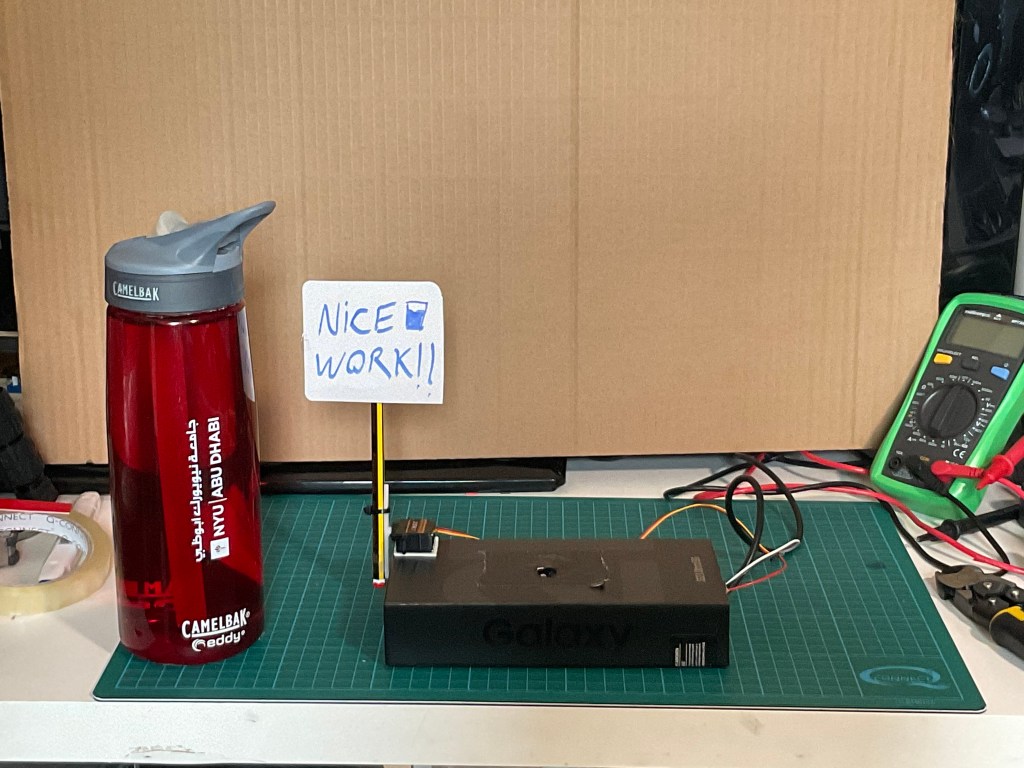
One of the things I forget to do quite regularly is drink water. I thought what if I could create a positive reinforcement habit loop by creating a device that gives me a compliment every time I have a drink. I decided I would use the LDR as an input and the servo as an output to create this device.
I changed out the pressure sensor for the LDR and with some adjustments to the code got the range of movement for the output where I needed it to be.
I then created a rudimentary enclosure frame the smartphone box and put all the Arduino setup inside of it leaving a hole so the LDR would be exposed. Once this was done I attached the servo to the outside of the box to test it. When I was happy with this I removed the plastic attachment form the motor, attached a pencil to it and made a small sign/flag to attach to the pencil, then I attached this sub assembly to the servo and it was ready to test.
With a few final tweaks to the code to make sure the sensor was in the correct range I tested the final product.
I think it would be cool to advance this project more by having it log interactions that shows how often the bottle was lifted up and then weighs the bottle when it is put down so you can see how much water is being drank. It may also be useful to put a small note board on the pencil that has reminders for tasks. Then each time you drink some water you check your list!
This weeks adventures in hardware proved to be many hours of trial and error, mostly error.
After spending too much time trying to get speaker to work with Arduino Nano 33 I finally gave up. It wasn’t for the lack of trying however. I though a lot of it was to do with wiring to the speaker which is an 8 ohm unit and here’s an example of how I tried to wire it up.
It turns out that there were some issues around the Nano not being able to drive the speaker! I moved on to trying out the next part of the assignment as I had expended a lot of time on this.
I went on to trying to attach the servo to the Arduino. I got the servo attached but it also would not function. Based on the prior experience of trying to attach the speaker I cut my losses with the servo and got hold of a smaller servo after ordering online and came back to it a day or 2 later.
Good news! The smaller servo worked! Awesome. Here’s a video of the pressure sensor working with the motor.
I tried out the LDR sensor with this set up to and it worked. I now have a few options to connect the servo and the sensors. This will help with coming up with some ideas for the next assignment which is an I/O project!
This week we had to create a sketch from patterns and loops, I am still getting to grips with the concept of creative coding so these exercises are proving to be a challenge. I am learning slowly to understand what is going on as I create a sketch.
I decided to create a pattern that consisted of multiple layers of flashing colors on top of each other. It is inspired by my time spent in Huaqiangbei in Shenzhen in China. This area is the biggest electronics market in the world and as you wander around these markets you see hundreds of thousands if not millions of LEDs all flashing on and off!
I think my biggest issues with executing code is trying to figure out variables. I get confused about logic quite frequently and regularly have to refer back to videos and tutorials.
With more time using P5.js I am confident some more of the problems I have will become less frequent! I have to do more of the challenges.
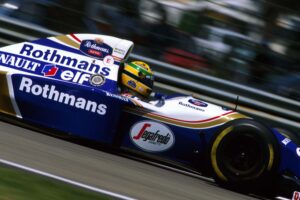
I have been an F1 fan since I was a kid and one of my heroes was Ayrton Senna. Getting up on Sunday to watch the races I would be in awe of Senna’s demonstration of speed and skill in driving one of the fastest, most powerful cars ever created. In this clip Senna speaks about driving beyond his conscious, he may have been in the flow state.
Senna was more than a driver, he was capable of untold unbelievable emotion that swayed to both ends of the scale. He could be easily hurt by others actions but he himself could be ruthless in his pursuit of glory. He was a hero and an antihero rolled into one.
I will never forget the day he crashed at the San Marino Grand Prix on the 1st May 1994. Seeing it live on TV most people thought he had survived and was brought to hospital especially considering the race went on to be completed meant no one knew for sure that he had been killed in the crash. Unfortunately his wasn’t the only fatality that weekend. Roland Ratzenberger also tragically lost his life in a crash the day previously.
20 years after his death Honda recreated one of Ayrton Sennas fastest laps at the Suzuka circuit in Japan. They used the engine telemetry data from the car on that lap to recreate the ghost lap through lights and speakers situated around the circuit all lighting up and activating in sequence of the data recorded and engine sound produced as Senna drove around the circuit.
It produces the most eerily beautiful effect and seeing it makes the hair stand up on the back of my neck every single time.
It is an incredible piece of work.
Here is a link to the video of how it was produced and the process behind it as well as the final result.